 |
MARCTOR® is a new fencing concept, based on the traditional framed fence. It is a module manufactured using sections around its perimeter,
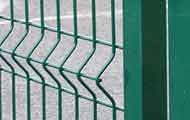
with an internal trim of panels with one or several reinforcement folds, depending on their height.
The reinforcement folds in the MARCTOR® module make this a very rigid enclosure, preventing the sagging effect of the traditional
framed fence.
MARCTOR® fencing are made up of the following elements.
|
Element characteristics and description
Module:
Rigid module, manufactured around the perimeter with 50x30x1.5-mm tubes for the two horizontal frames and 40x30x1.5-mm tubes, with tabs, for the two vertical frames.
Sendzimir Z-275 galvanised tube with a zinc coating of 140 grams/m2 on each face of the tube.
A panel that mainly uses 250x50-mm meshes (50x50-mm for the folds). Wire diameter: 5.00 mm Zinc mass = 75 grams/m2.
Module subsequently coated in polyester with a minimum thickness of 120 microns.
Two ground supports per module, using 30x30x1.0-mm tubes to prevent the module from sagging or bending.
Post:
60x60 tube with a thickness of 1.50 mm.
Press-fit plastic cap.
No drill holes to prevent premature rusting.